New York, NY (PRWEB) September 16, 2009 -- iYogi, the on-demand tech services company with a unique global delivery model, announced today the results of a consumer poll regarding support concerns and predictions for the upcoming launch of the new Microsoft Windows 7 operating system. Based on responses from more than 1,000 Windows XP and Windows Vista users, 52 percent think that moving to a new operating system and moving their data is a hassle, suggesting some real frustrations on the near horizon. Nearly half (47 percent) think upgrading to Microsoft Windows 7 may require a call to technical support - potentially causing a huge backlog of support needs, as up to 40 million copies of Windows 7 are expected to be sold in 2009, according to IDC.
"We predict that more than 40 percent of XP users will generate support calls and inquiries globally this year and even more in 2010 as mass adoption kicks in and people face the prospect of dealing with an entirely new interface," said Vishal Dhar, President Marketing & Co-founder of iYogi. "We estimate twice as many support calls for current Windows XP users than Windows Vista users, since Microsoft Windows XP users will require a 'clean' install including migrating applications, settings and drivers--a potentially arduous, time-intensive task."
We predict that more than 40 percent of XP users will generate support calls and inquiries globally this year and even more in 2010 as mass adoption kicks in and people face the prospect of dealing with an entirely new interface
Additional survey findings reveal:
* 58 percent of users think they will or may upgrade to Windows 7, an encouraging number considering some of the backlash surrounding Vista
* Only 39 percent of users are aware that Windows 7 is launching soon, suggesting an increased flurry of help questions in the coming months as more people become aware of the upgrade options
iYogi has more has more than 90,000 annual subscribers and provides thousands of single incident sessions every day on a 24/7 basis. Its Global Delivery Platform delivers on the highest customer satisfaction benchmarks in the industry and gets smarter with every customer interaction, building a powerful knowledge base that provides unique customer insights on predictive needs to tech support.
ABOUT IYOGI
iYogi is a global on-demand services company that provides personalized computer support for consumers and small businesses in United States, United Kingdom, Canada and Australia. iYogi's unique model, including proprietary technology iMantra and highly qualified technicians, is designed to eliminate computer-related stress and keep millions of digitally dependent consumers and small businesses always protected and productive. Only iYogi -- with its proven global expertise delivery model, intelligent customer insight systems, easy-to-use self-help tools and automated PC optimization and computer support services - offers users a simple yet comprehensive path to digital serenity. iYogi has perfected the remote technical support model to overcome the current limitations of in-store, on-site, or call center services to become the fastest growing provider of support in the industry. Major resellers and technology companies are increasingly turning to iYogi to improve customer satisfaction, reduce return rates, and deliver a compelling new-value added offering to customers. For more information on iYogi and a detailed list of technologies supported, visit: www.iyogi.net.
Thursday, September 17, 2009

Thursday, September 10, 2009
How to Delete Temporary Internet Files
Some time you are facing problems with your Internet speed and getting slow speed due to unnecessary temporary file, to improve internet speed you have to delete temporary file and speed up internet speed
To delete Temp file Follow the instruction
1. Start the browser, select Tools > Internet Options.
2. Go to Advanced.
3. Go to the Security area and check the box to Empty Temporary Internet Files folder when browser is closed.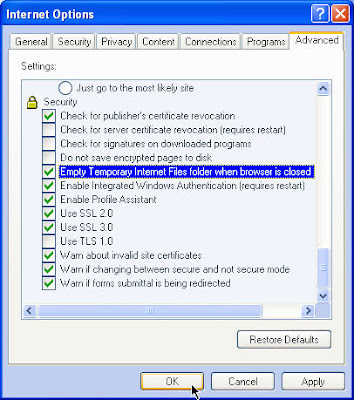
This tips work in Win 98,NT,windows xp, windows 2000 and windows server 2003
To delete Temp file Follow the instruction
1. Start the browser, select Tools > Internet Options.
2. Go to Advanced.
3. Go to the Security area and check the box to Empty Temporary Internet Files folder when browser is closed.

This tips work in Win 98,NT,windows xp, windows 2000 and windows server 2003
Tuesday, September 1, 2009
Increase Internet Connection Speed in Windows XP
This tip is describe for increase internet speed in Windows XP, but it should work for 56k modems too.
QoS Packet Scheduler is a method of network bandwidth management that can monitor the importance of data packets and depending upon the priority of the packet, give it higher or lower priority or bandwidth levels. It's not very useful unless you're using apps which are QoS-aware or running a server, so you can gain some network overhead back by turning it off.
Note: This following tip will not work on XP Home Edition.
1. Make sure you're logged on as actually "Administrator". Do not log on with any account that just has administrator privileges.
2. Start > Run > type gpedit.msc (not available in home version).
3. Expand the Local Computer Policy branch.
4. Expand the Administrative Templates branch.
5. Expand the Network branch.
6. Highlight the "QoS Packet Scheduler" in left window.
7. In right window double click the "limit reservable bandwidth" setting.
8. On setting tab check the ENABLED item.
9. Where it says "Bandwidth limit %" change it to read 0 (ZERO).
10. Close gpedit.msc.
Effect is immediate on some systems, some need to re-boot.
QoS Packet Scheduler is a method of network bandwidth management that can monitor the importance of data packets and depending upon the priority of the packet, give it higher or lower priority or bandwidth levels. It's not very useful unless you're using apps which are QoS-aware or running a server, so you can gain some network overhead back by turning it off.
Note: This following tip will not work on XP Home Edition.
1. Make sure you're logged on as actually "Administrator". Do not log on with any account that just has administrator privileges.
2. Start > Run > type gpedit.msc (not available in home version).
3. Expand the Local Computer Policy branch.
4. Expand the Administrative Templates branch.
5. Expand the Network branch.
6. Highlight the "QoS Packet Scheduler" in left window.
7. In right window double click the "limit reservable bandwidth" setting.
8. On setting tab check the ENABLED item.
9. Where it says "Bandwidth limit %" change it to read 0 (ZERO).
10. Close gpedit.msc.
Effect is immediate on some systems, some need to re-boot.
Thursday, August 27, 2009
How to Stop Browser Pop Ups in Firefox 3.x
The best way to get rid of browser pop-ups is by leveraging the built in features of the most popular browsers. This post will focus on Internet Explorer 7 and Mozilla Firefox 3.Browsers help you to increase internet speed.
Firefox 3 users have an advantage as the built-in pop-up block has the ability to block up pretty much any pop-up window, so let's get started.
Select Tools menu, then Options.
When the options window opens, click on the content tab and make sure the Block pop-up windows option is checked.
As of now we have the basic pop-up protection enabled, but what happens if you need to activate the pop-ups for a specific website that Firefox is blocking?
n order to allow pop-ups for a specific website, open the options window again (Steps 1 & 2). Go to the content tab and click on the exceptions button.
When the exceptions window opens, add the address you want to allow pop-ups on using the following naming convention: www.sitename.com / www.sitename.net (you get the drill). Then click the Allow button followed by the OK button to go back to the options window.
Now you have created an exception to allow pop-ups for that website. This process can be repeated as needed.
If for any reason you change your mind and want to remove one of the website that you added as an exception to allow pop-ups you just need to go back to the Allowed Sites window (Steps 1-3).
Now look the website you want to remove from your “Allow Pop-ups” list and highlight it. Next click the Remove Site button. The site will disappear from the list and pop-ups won’t be allowed on that website
Firefox 3 users have an advantage as the built-in pop-up block has the ability to block up pretty much any pop-up window, so let's get started.
Select Tools menu, then Options.
When the options window opens, click on the content tab and make sure the Block pop-up windows option is checked.
As of now we have the basic pop-up protection enabled, but what happens if you need to activate the pop-ups for a specific website that Firefox is blocking?
n order to allow pop-ups for a specific website, open the options window again (Steps 1 & 2). Go to the content tab and click on the exceptions button.
When the exceptions window opens, add the address you want to allow pop-ups on using the following naming convention: www.sitename.com / www.sitename.net (you get the drill). Then click the Allow button followed by the OK button to go back to the options window.
Now you have created an exception to allow pop-ups for that website. This process can be repeated as needed.
If for any reason you change your mind and want to remove one of the website that you added as an exception to allow pop-ups you just need to go back to the Allowed Sites window (Steps 1-3).
Now look the website you want to remove from your “Allow Pop-ups” list and highlight it. Next click the Remove Site button. The site will disappear from the list and pop-ups won’t be allowed on that website
Monday, August 24, 2009
How to fix Internet Explorer Runtime Error
An error message is popping up in IE6 that I am not sure how to fix. It happens on several web pages I have visited. It says A Run time Error has occurred. This post provides internet explorer support to fix run time error and increase internet speed.
Follow the Steps
- Click Start, Settings, Control Panel
- Go To Internet Options
- Click The "Advanced" tab, Scroll down to "Browsing", check "Disable Script
Debugging", uncheck "Display a notification about every script error", - click "Apply", "OK"
Additional Solution
- Control Panel / Internet Options / Advanced tab.
- Check 'Disable script debugging'.
- Uncheck 'Display a notification about every script error'.
Wednesday, August 19, 2009
How to Make Internet Explorer 7 the Default Browser
If you want to make IE 7 to configure as default browser this section provides internet explorer support to IE 7 the default browser.
If you have installed other web browsers such as Mozilla Firefox, Google Chrome, or Safari for Windows, you may have set one of these browsers to be the default browser Windows opens when applications access webpages.
Whether this was done deliberately or accidentally, you may later decide to make Internet Explorer 7 the default browser. This may be useful if you often visit websites that do not display correctly on other browsers.
1. Click on the "Tools" button in the toolbar, selecting "Internet Options".
2. When the "Internet Properties" dialog box appears, click the "Programs" tab.
3. Underneath "Default web browser", click the "Make default" button.
4. If desired, check "Tell me if Internet Explorer is not the default web browser". This way you will be notified every time you start Internet Explorer if another browser has been set up to be the default.
5. Click "OK" to close the dialog box.
If you have installed other web browsers such as Mozilla Firefox, Google Chrome, or Safari for Windows, you may have set one of these browsers to be the default browser Windows opens when applications access webpages.
Whether this was done deliberately or accidentally, you may later decide to make Internet Explorer 7 the default browser. This may be useful if you often visit websites that do not display correctly on other browsers.
1. Click on the "Tools" button in the toolbar, selecting "Internet Options".
2. When the "Internet Properties" dialog box appears, click the "Programs" tab.
3. Underneath "Default web browser", click the "Make default" button.
4. If desired, check "Tell me if Internet Explorer is not the default web browser". This way you will be notified every time you start Internet Explorer if another browser has been set up to be the default.
5. Click "OK" to close the dialog box.
Thursday, August 13, 2009
Enable or Disable Tabbed Browsing
Configure whether you want tabbed browsing enabled or disabled in the Internet Explorer 7 web browser.By default, tabbed browsing should be enabled for Internet Explorer 7, allowing you to open websites in multiple tabs inside the same browser window. This post provides browser support to enable or disabled tabbed in internet explorer 7
 A sample Internet Explorer 7 screenshot with tabbed browsing enabled.
Depending on your configuration, tabbed browsing might have accidentally been disabled and you want to turn it on. Or, you may hate tabbed browsing, wanting this "feature" removed. Turning off tabbed browsing changes the Internet Explorer 7 interface slightly as shown in the below screenshot.
 A sample Internet Explorer 7 screenshot with tabbed browsing disabled.
To enable or disable tabbed browsing in Internet Explorer 7:
1. Click the "Tools" button, selecting "Internet Options".
2. When the "Internet Options" multi-tabbed dialog box appears, click the "General" tab.
3. Underneath "Tabs", click the "Settings" button.
4. A "Tabbed Browsing Settings" dialog box will appear. Near the top of the box, check or uncheck "Enable Tabbed Browsing" as desired.
5. Click "OK" on the two dialog boxes to close them.
6. Restart Internet Explorer 7 for the change to take place.
 A sample Internet Explorer 7 screenshot with tabbed browsing enabled.
Depending on your configuration, tabbed browsing might have accidentally been disabled and you want to turn it on. Or, you may hate tabbed browsing, wanting this "feature" removed. Turning off tabbed browsing changes the Internet Explorer 7 interface slightly as shown in the below screenshot.
 A sample Internet Explorer 7 screenshot with tabbed browsing disabled.
To enable or disable tabbed browsing in Internet Explorer 7:
1. Click the "Tools" button, selecting "Internet Options".
2. When the "Internet Options" multi-tabbed dialog box appears, click the "General" tab.
3. Underneath "Tabs", click the "Settings" button.
4. A "Tabbed Browsing Settings" dialog box will appear. Near the top of the box, check or uncheck "Enable Tabbed Browsing" as desired.
5. Click "OK" on the two dialog boxes to close them.
6. Restart Internet Explorer 7 for the change to take place.
